How to Remove Zr89YEwgl7.exe "Zr89" Spyware/Malware [Trojan:Win32/Wacatac.B!ml]

We may receive a commission for purchases made through some ads/links on this page A new data-stealing malware is on the loose! First repor...

Friday, August 28, 2020

How to Verify File Integrity on Windows by Caclulating a Checksum


Checksum Example
Are you worried about accidentally downloading malware from a hijacked website or from what you thought was a reliable source of clean software? Fortunately, there's an easy way to verify the integrity of any file and ensure it's not a threat to your computer. This method involves calculating the hash (checksum) of a suspicious file by using Windows PowerShell.

1. Begin by starting PowerShell. This can be done by pressing the Windows-key and R to open the run dialog and typing 'powershell'.

Run Powershell Screenshot
If this doesn't open PowerShell on your computer, you can also just search for the application and open it using Windows Search on the bottom left corner of your screen.

2. Once PowerShell has started, type the command 'Get-FileHash' and the path of a file you would like to verify. Then, press enter and save the output somewhere you can access again.

Powershell File Hash
3. Visit your software vendor's website or another trusted source and search for a checksum value. On our website, for instance, we provide hashes at the end of every software page.
Riserbo Software Page Checksum

4. Compare the provided checksum value with the hash you just calculated with PowerShell. Does it match? If so, the file is probably safe to use as long as you trust the vendor. That's it! Make sure to subscribe to the blog for more short guides like this one.

Note: Matching checksum values does not always guarantee that a suspicious file is clean or safe to use. Under rare circumstances, a vendor's site may have been breached and checksum values could have been changed. Generally, it is good practice to use this method along with Antivirus for any potentially dangerous files.

Thursday, August 6, 2020

List of Fixes for Slow Internet Speed on Windows Computers


Slow Internet on Windows 10 Computers
Having a slow internet can be one of the most frustrating issues for new PC users, and unfortunately it can also stem from problems within your computer as well as your network. In this list, we included five possible solutions for your slow internet issues on a Windows computer.

1. Limit Background App Usage:
The most common reason for having slow internet on a Windows computer despite having a decent connection is too many internet-reliant background apps. Although you may only have a couple visible applications open at a time, there are hundreds of other services running in the background. To check these services open Task Manager (Ctrl + Shift + Esc) and scroll down to 'Background Processes'
Windows 10 Task Manager Background Processes
Check all of your background apps and make sure nothing unnecessary is running. If you find a service you'd like to stop, select it's name and click the 'End task' button at the bottom.

2. Disable Extra Services from Resource Monitor
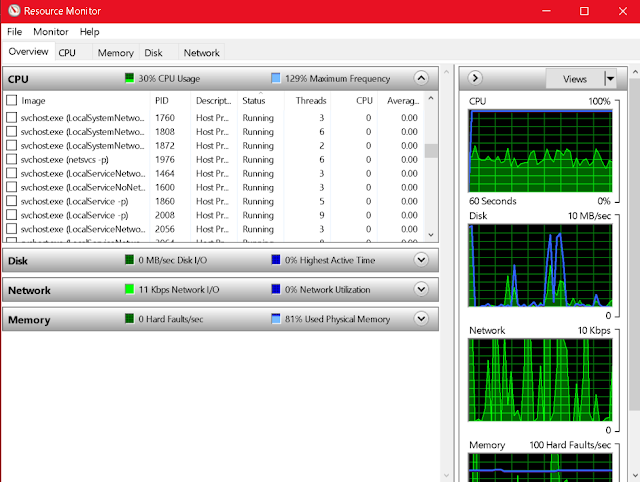
If you would like to view and disable background apps that use the most bandwidth, you must access Resource Monitor. To do this, open Task Manager (Ctrl + Shift + Esc) and click 'Performance'. Then, click the 'Open Resource Monitor' at the bottom. The following application should open:
Windows 10 Resource Monitor
Resource Monitor should automatically order your background services by network usage. Check the top apps and make sure they are necessary before stopping or uninstalling them.

3. Disable Large Send Offload
Large Send Offload (LSO) is a Windows feature designed to allow background apps and services utilize more bandwidth. Stopping this might improve your internet speed drastically. Start by pressing Windows Key + X.
Windows 10 Key X
Then, click 'Device Manager' to open the Device Manager.
Windows 10 Device Manager
Once you've opened Device Manager, click the 'Network adapters' menu and find the device you use. Right click on this device and select 'Properties'. From the Properties menu, click on the 'Advanced' tab and scroll down until you see 'Large Send Offload'. There will be one for IPv4 and IPv6. Click each and select 'Disabled' on the right.
Windows 10 Large Send Offload
Click 'OK' and Large Send Offload should be disabled.

4. Background Updates
By default, Windows 10 may automatically download updates before prompting you to install them. This can have a significant impact on your internet speed. To change this, open the Settings app and click on 'Update & Security'. This will show your current update settings and allow you to manage download/installation from there.
Windows 10 Update and Security Settings

5. Additional Problems
If you're using third-party firewall software or custom firewall settings, they could also be limiting your internet speed. Try reconfiguring your firewall and testing your internet to find a desirable balance between security and speed. Finally, ensure your network adapter drivers are correct and up-to-date.

Monday, August 3, 2020

How to Control Any Windows Computer on Your Network - The RemoteLance Tutorial


Whether you're a business administrator or an individual seeking more control over their home network, being able to access and operate your computers remotely can make a huge difference when it comes to productivity. In this guide, you will learn how to access any remote Windows computer on your network. Setup takes seconds and remote connections will be persistent.

Riserbo RemoteLance Console Logo

Begin by downloading the RemoteLance console app from our website. For a full guide on using this software, check out our How-To video here:


After you've installed RemoteLance, open the RemoteLance-Server program on every computer you would like to access remotely. The server will run in the background and can be terminated through a client program. After opening the server file on your remote computers, start the client program on a PC you wish to use as a controller for the others. When first opened, the client application will prompt you for a product key. You can find this product key in your email after downloading RemoteLance. Copy and paste the key into the prompt and press enter to activate the program.

Once activated, you may connect to any computer on your network running the RemoteLance server. Just type it's local IP address (preferably IPv4) and you should form a connection within seconds. Type 'help' after connecting to get a list of commands.

Windows RemoteLance Console Help Command
To make a connection with any remote computer persistent type 'startup'. This will copy the server program to the remote user's startup location so that it will execute every time the computer is started.

Windows RemoteLance Console Persistent Command
To remotely encrypt files or directories type 'encrypt'. This will send a series of prompts asking you for custom information so you can safely encrypt particular files. Decryption is as simple as using the 'decrypt' command which sends a similar panel of prompts.

Windows RemoteLance Console Encryption Command
To permanently kill a running server on a remote computer (until the server program is re-opened), connect to that computer and use the 'terminate' or 'kill' command.

Windows RemoteLance Console Terminate Command
To explore the many other RemoteLance commands and how they work, check out our info page here. Alternatively, you can also purchase a copy of this software directly from our store.